You're busy, hungry between meals, and want something that actually fills you up—without the sugar crash. These healthy snacks are designed to keep you satisfied, boost energy, and taste great whether you're at your desk, packing for school, or feeding a cranky afternoon crowd.
You'll find six recipes below with clear ingredients, exact measurements, realistic timing, and step-by-step instructions so you can make them today. I recommend using a food processor for a few of these snacks and storing extras in mason jars for grab-and-go convenience. Each recipe is balanced for protein, fiber, or healthy fats—so these healthy snacks actually keep you full and happy.
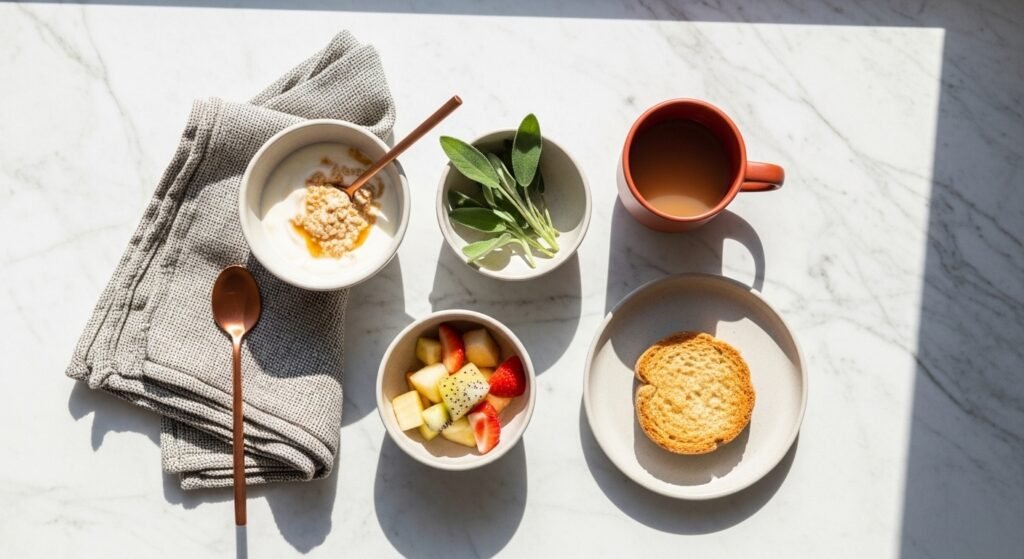
1. Greek Yogurt Berry Parfait — Healthy Snacks for Busy Mornings
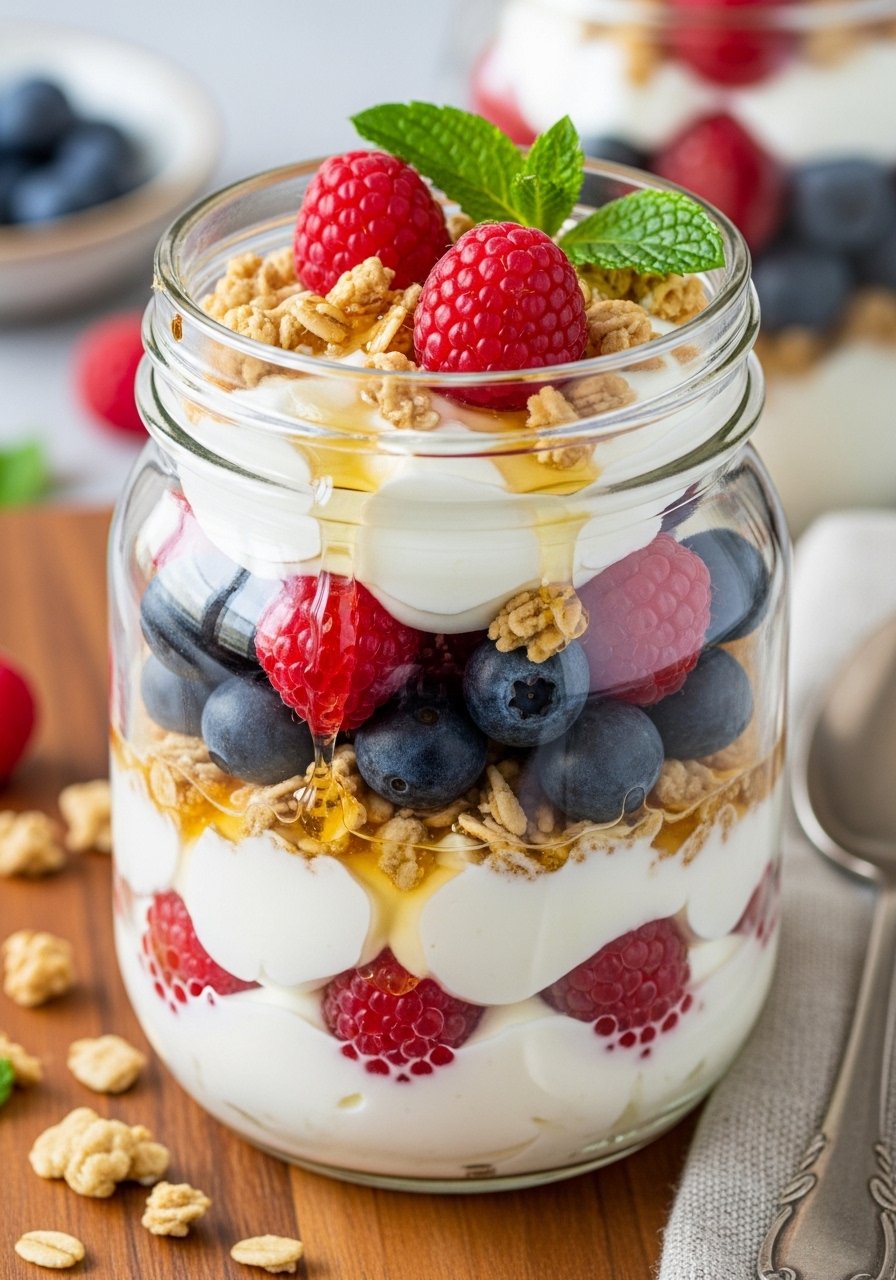
Creamy Greek yogurt layered with tart berries and crunchy granola hits all the right notes: tang, sweetness, and texture. This parfait is high in protein and fiber, making it one of the easiest healthy snacks to throw together in minutes. The bright fruit smells fresh and looks irresistible—perfect for busy mornings or an afternoon pick-me-up. Anyone who loves simple, fresh flavors will reach for this repeatedly.
Ingredients
- 1 1/2 cups plain Greek yogurt (full-fat or 2%)
- 1 cup mixed berries (strawberries, blueberries, raspberries), halved if large
- 1/2 cup honey-sweetened granola (choose low-sugar)
- 2 tbsp raw almonds, chopped
- 1 tbsp chia seeds
- 1 tsp pure vanilla extract
- 1 tbsp honey or maple syrup (optional)
- 1/4 tsp ground cinnamon
- Fresh mint leaves for garnish
- 2 mason jars for serving
Instructions
- Stir the Greek yogurt, vanilla extract, and ground cinnamon in a medium bowl until smooth.
- Sweeten to taste with honey or maple syrup if you prefer a sweeter parfait.
- Add chia seeds to the yogurt mixture and let sit 3 minutes so they hydrate slightly.
- Place 2 tbsp granola in the bottom of each mason jar to create a crunchy base.
- Spoon about 3/4 cup yogurt mixture over the granola in each jar.
- Top with 1/2 cup mixed berries per jar, distributing evenly.
- Sprinkle each jar with chopped almonds and the remaining granola.
- Finish with a small drizzle of honey and garnish with mint leaves.
- Close jars and chill for up to 24 hours. Give them a quick stir before eating.
Helpful tool tip: Layering is easier with a small food-safe spatula—an offset spatula spreads the yogurt without smudging the jar sides.
How to Serve It
Serve chilled straight from the jar for travel-friendly presentation. Add a dusting of extra cinnamon or a few dark chocolate shavings for an indulgent touch. Store leftovers in mason jars in the fridge for up to 24–48 hours—the granola will soften over time but stays tasty. These parfaits pair nicely with a small espresso or green tea for a balanced snack.
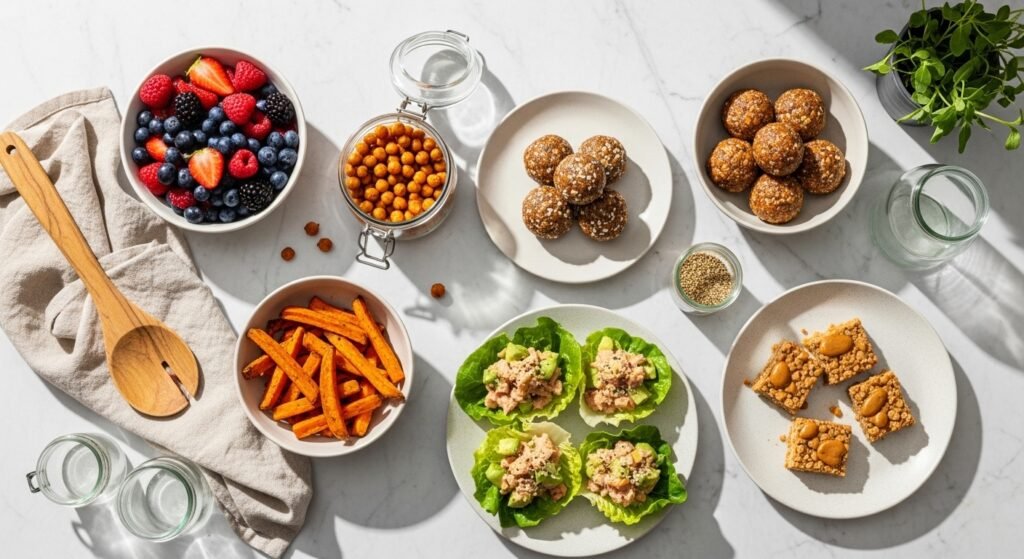
2. Savory Roasted Chickpeas with Smoked Paprika
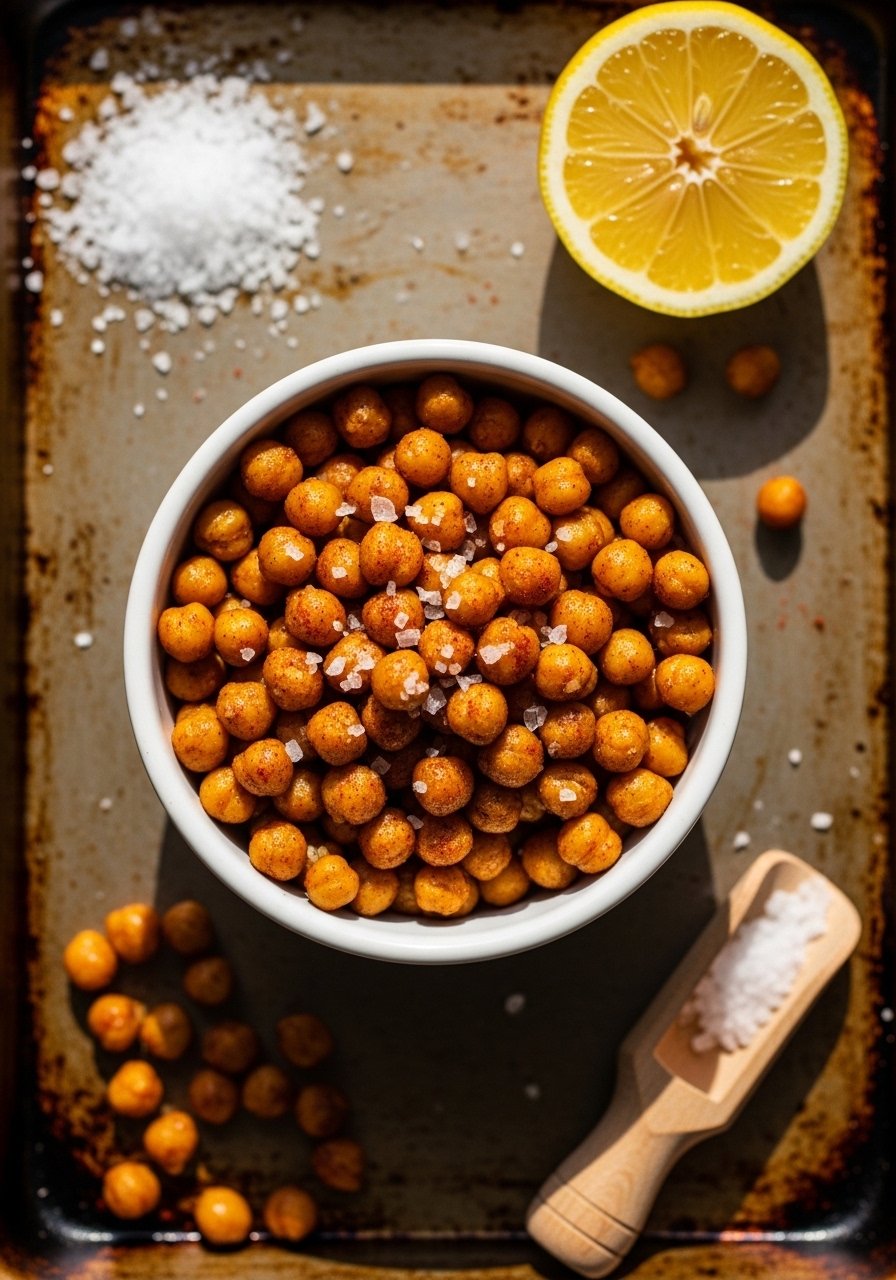
Crunchy, savory roasted chickpeas are a protein- and fiber-packed snack that replaces chips beautifully. They get crisp on the outside and tender inside, with smoky, slightly spicy flavor. This snack works for afternoon cravings, lunchboxes, or tossed over salads for extra crunch. Nutty aroma and toasty notes make them addictive.
Ingredients
- 2 cans (15 oz each) chickpeas (garbanzo beans), drained and rinsed
- 2 tbsp olive oil
- 1 1/2 tsp smoked paprika
- 1/2 tsp ground cumin
- 1/4 tsp cayenne pepper (optional for heat)
- 1/2 tsp garlic powder
- 1/2 tsp onion powder
- 3/4 tsp fine sea salt
- 1/4 tsp freshly ground black pepper
- Zest of 1 lemon (optional)
- Fresh parsley, chopped, for garnish
Instructions
- Preheat oven to 425°F (220°C) and line a baking sheet with a silicone baking mat or parchment paper.
- Spread the rinsed chickpeas on a clean kitchen towel and pat dry. Remove loose skins for extra crispiness.
- Transfer chickpeas to a bowl and toss with olive oil until evenly coated.
- Combine smoked paprika, cumin, garlic powder, onion powder, cayenne, salt, and pepper in a small dish.
- Sprinkle the spice mix over the chickpeas and toss to coat.
- Spread chickpeas in a single layer on the prepared baking sheet.
- Roast for 25–30 minutes, shaking the pan every 8–10 minutes so they brown evenly. Look for golden, blistered skins.
- Remove from oven and immediately zest lemon over chickpeas and toss with fresh parsley.
- Let cool 10 minutes—they crisp further as they cool.
I like using a reliable heavy-duty baking sheet for even browning: heavy-duty baking sheet.
How to Serve It
Serve warm or at room temperature in a small bowl as a crunchy snack. Great sprinkled over a green salad or into grain bowls for texture. Store cooled chickpeas in an airtight container at room temperature for up to 3 days—if they soften, re-crisp on a baking sheet in a 350°F (175°C) oven for 5–8 minutes. These roasted chickpeas are one of my go-to savory healthy snacks for road trips.
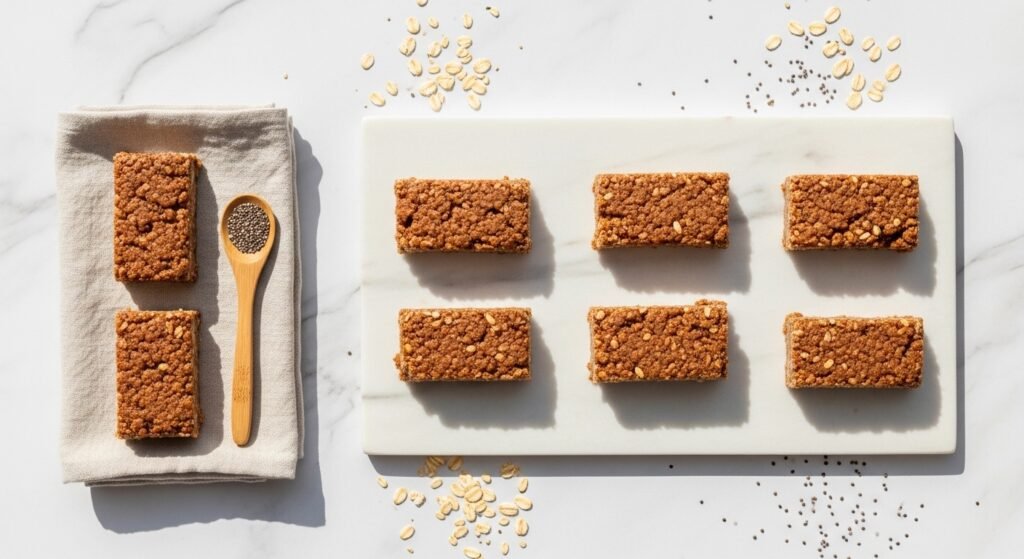
3. No-Bake Peanut Butter Oat Bars — Healthy Snacks On-The-Go
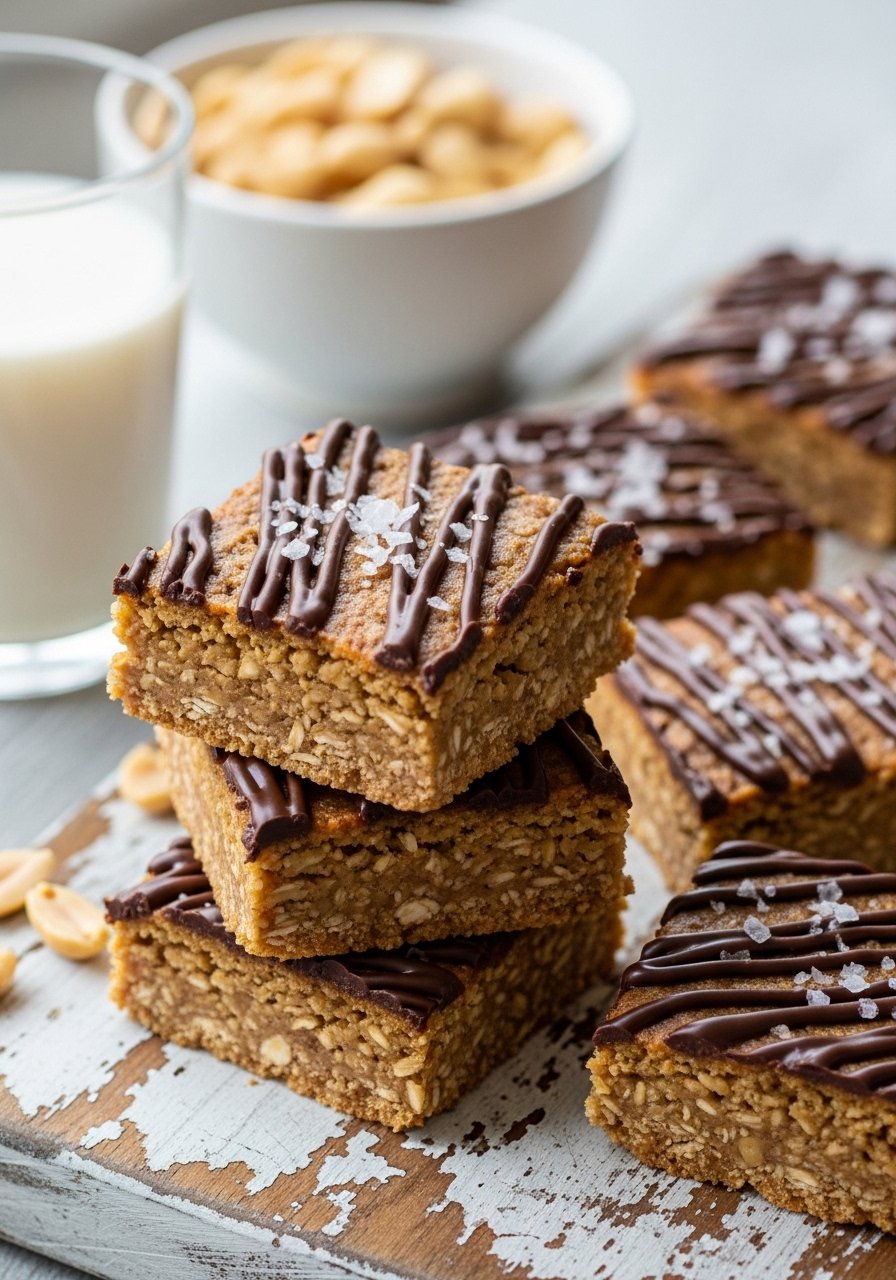
No baking, big flavor, and portable—these oat bars balance peanut butter richness with chewy oats and a hint of dark chocolate. They're high in complex carbs and healthy fats, which makes them a top choice for pre- or post-workout fueling. The texture is chewy and slightly sticky, and the smell is pure peanut-butter-y comfort.
Ingredients
- 2 cups rolled oats (old-fashioned)
- 3/4 cup natural peanut butter (stirred)
- 1/2 cup honey or maple syrup
- 1/4 cup coconut oil, melted
- 1/3 cup ground flaxseed
- 1/3 cup chopped roasted peanuts
- 1/4 cup mini dark chocolate chips
- 1 tsp vanilla extract
- 1/4 tsp fine sea salt
- 1/2 tsp ground cinnamon
- Optional: 2 tbsp unsweetened shredded coconut
Instructions
- Line an 8×8-inch square pan with parchment paper, leaving a 1-inch overhang for easy removal.
- In a medium saucepan over low heat, combine peanut butter, honey, and coconut oil. Stir until smooth and warm (about 2–3 minutes).
- Remove from heat and stir in vanilla extract and sea salt.
- In a large bowl, mix rolled oats, ground flaxseed, chopped peanuts, cinnamon, and shredded coconut (if using).
- Pour the warm peanut mixture over the dry mix and fold until evenly combined.
- Press the mixture firmly into the prepared pan using a spatula or an offset spatula to create an even layer.
- Sprinkle mini dark chocolate chips on top and gently press them into the surface.
- Chill in the fridge for at least 1 hour until firm.
- Lift out using the parchment overhang and cut into 12 bars. Store chilled.
For even slices, chill fully and use a sharp knife on a cutting board—try a wood cutting board to protect your blades.
How to Serve It
Wrap bars individually in parchment or store in glass meal prep containers for up to 5 days in the fridge. They taste great slightly chilled or at room temp. Pair with Greek yogurt or a banana for a fuller snack. Make-ahead tip: double the recipe and freeze extras for up to 3 months; thaw overnight in the fridge.
4. Avocado Tuna Salad Lettuce Cups (Low-Carb, Keto-Friendly Option)
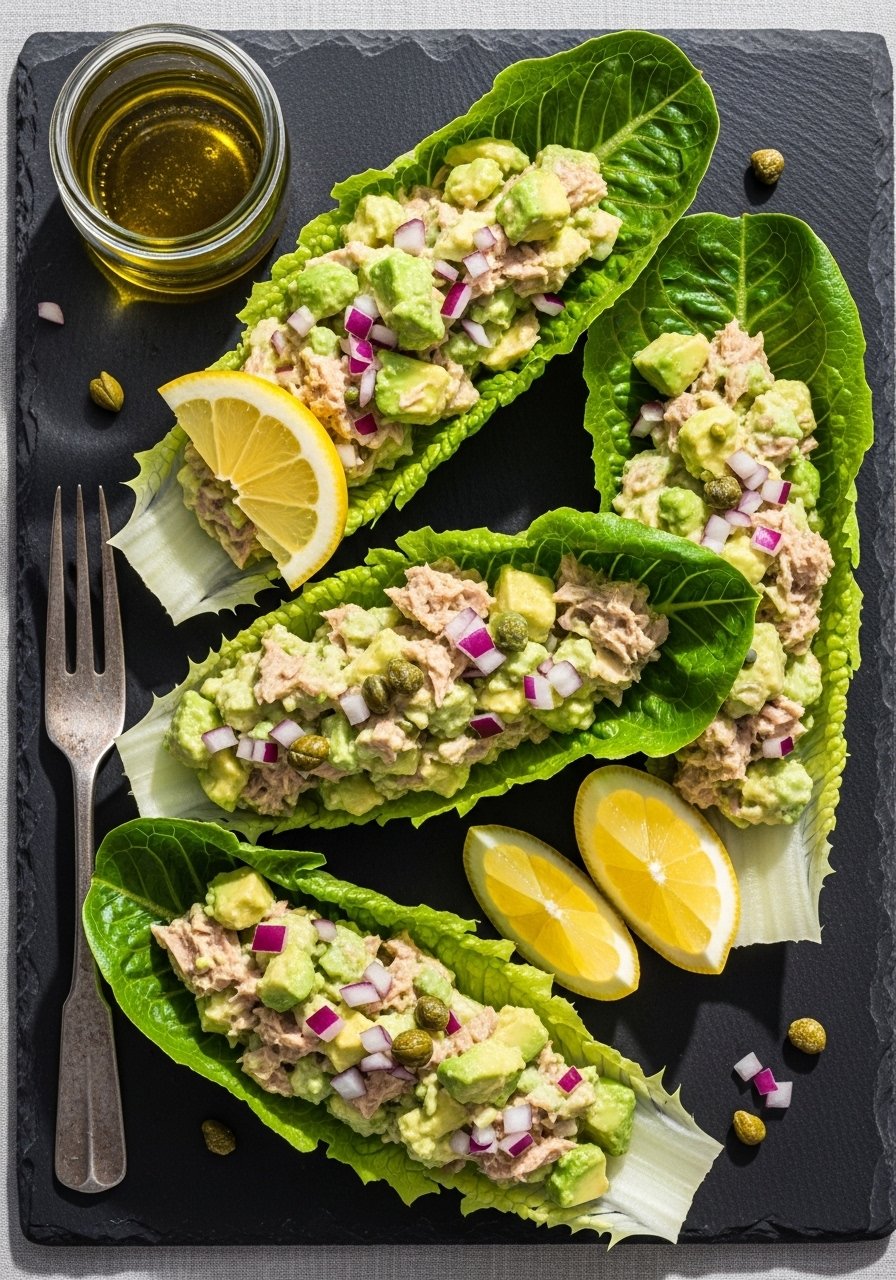
These avocado tuna lettuce cups are creamy, tangy, and satisfying—packed with healthy fats and protein while staying low-carb. The avocado replaces mayo for creaminess and a bright green hue. The texture is silky with little pops from capers and crunch from celery. Perfect for a light lunch, picnic, or as one of your healthy snacks when you want something refreshing.
Ingredients
- 2 cans (5 oz each) chunk light tuna in water, drained
- 1 large ripe avocado, mashed
- 1/4 cup plain Greek yogurt (or extra mashed avocado for dairy-free)
- 2 tbsp lemon juice (fresh)
- 1/4 cup celery, finely diced
- 2 tbsp red onion, finely diced
- 1 tbsp capers, roughly chopped
- 1/2 tsp Dijon mustard
- 1/4 tsp garlic powder
- Salt and pepper to taste
- 6–8 large romaine or butter lettuce leaves
- Optional: chopped fresh dill or parsley for garnish
Instructions
- In a medium bowl, mash the avocado until mostly smooth.
- Add the Greek yogurt, Dijon, lemon juice, and garlic powder. Stir until combined.
- Fold in the drained tuna, celery, red onion, and capers. Mix gently to keep some tuna texture.
- Season with salt and pepper and taste—adjust lemon or salt as needed.
- Spoon about 1/3 to 1/2 cup tuna mixture into each lettuce leaf.
- Garnish with fresh dill and an extra squeeze of lemon.
- Serve immediately or chill for up to 6 hours before serving.
If prepping ahead, keep the tuna mixture in an airtight container separate from lettuce to avoid sogginess.
How to Serve It
Arrange the lettuce cups on a platter and garnish each with a lemon wedge. Pair with crunchy raw veggies or a small side of roasted chickpeas for extra fiber. To pack for lunch, place tuna mixture in a small container and pack lettuce leaves separately in a glass meal prep container. These lettuce cups are a refreshing healthy snack or light meal perfect for warm days.
5. Baked Sweet Potato Fries with Yogurt Herb Dip — Healthy Snacks Side
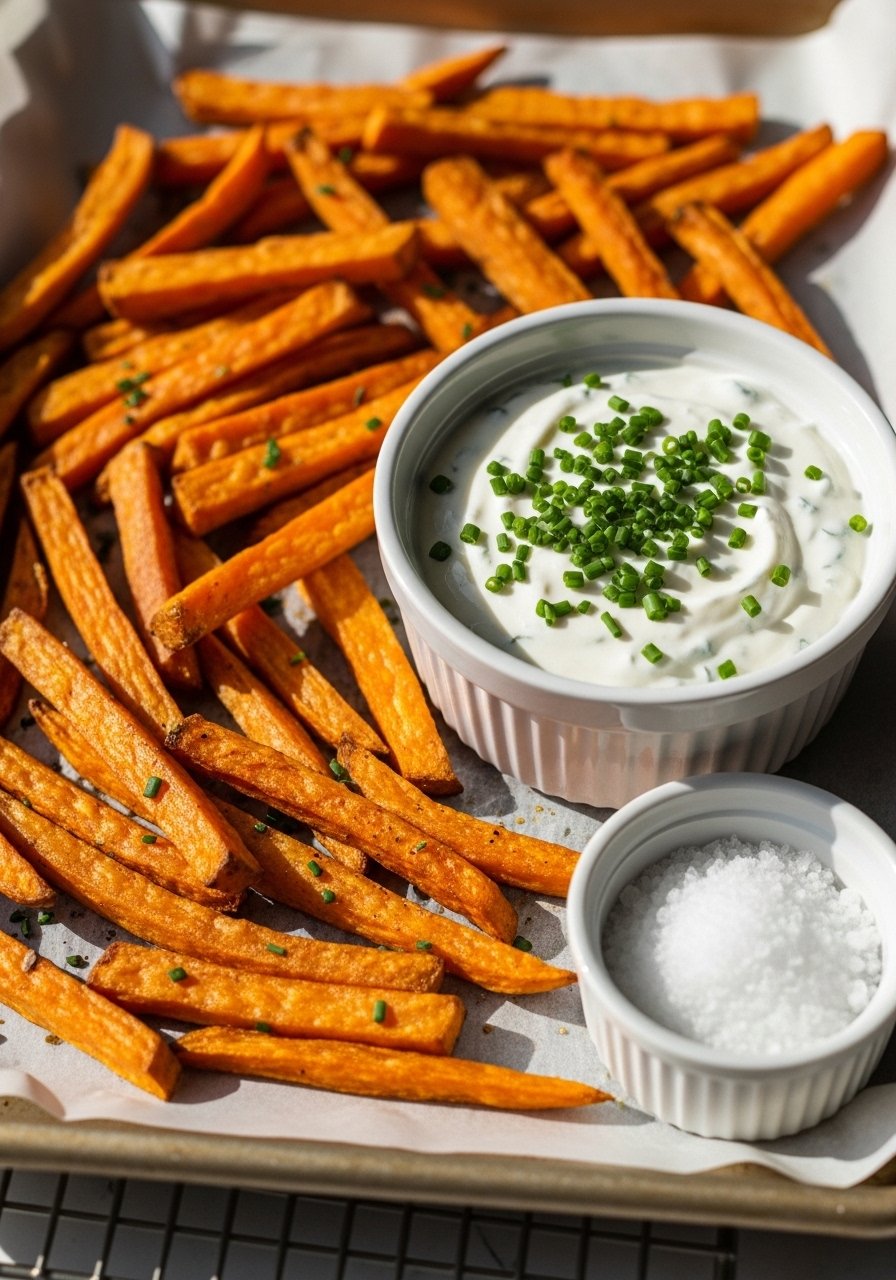
Sweet potato fries are comforting but boosted with fiber and beta-carotene—baked until crisp, not fried. Paired with a tangy yogurt-herb dip, they become a satisfying snack that feels indulgent but stays wholesome. They're slightly sweet, lightly caramelized, and make a great veggie-forward swap for traditional fries.
Ingredients
- 2 large sweet potatoes (about 1.5–2 lbs), scrubbed
- 2 tbsp olive oil
- 1 tsp smoked paprika
- 1/2 tsp garlic powder
- 1/2 tsp ground black pepper
- 3/4 tsp fine sea salt, divided
- 1 tbsp cornstarch or arrowroot powder (for extra crispiness)
- 1 tbsp fresh chopped rosemary (or 1 tsp dried)
- 1 cup plain Greek yogurt
- 1 tbsp lemon juice
- 1 tbsp fresh chives, chopped
- 1 tbsp fresh parsley, chopped
Instructions
- Preheat oven to 425°F (220°C). Line a baking sheet with a silicone baking mat or parchment paper.
- Cut sweet potatoes into 1/4–1/2-inch thick fries for even cooking.
- Toss fries in a large bowl with cornstarch, which helps them crisp.
- Drizzle with olive oil and add smoked paprika, garlic powder, rosemary, half the sea salt, and pepper. Toss until evenly coated.
- Arrange fries in a single layer on the baking sheet—do not overcrowd.
- Bake for 20–25 minutes, flipping halfway, until edges are caramelized and fries are crisp.
- While fries bake, mix Greek yogurt, lemon juice, chives, parsley, and remaining salt in a small bowl for the dip.
- Remove fries and let rest 3 minutes; they crisp further as they cool.
Use a non-stick baking sheet and a silicone spatula to turn fries without breaking them.
How to Serve It
Serve fries hot with the yogurt herb dip and a sprinkle of flaky sea salt. They pair well with grilled chicken or a green salad for a fuller plate. Store cooled fries in an airtight container in the fridge for up to 3 days; reheat in an air fryer at 350°F (175°C) for 3–5 minutes to regain crispiness. These fries make a crowd-pleasing healthy snack alternative.
6. Energy-Boosting Trail Mix Energy Balls (Vegan Option)
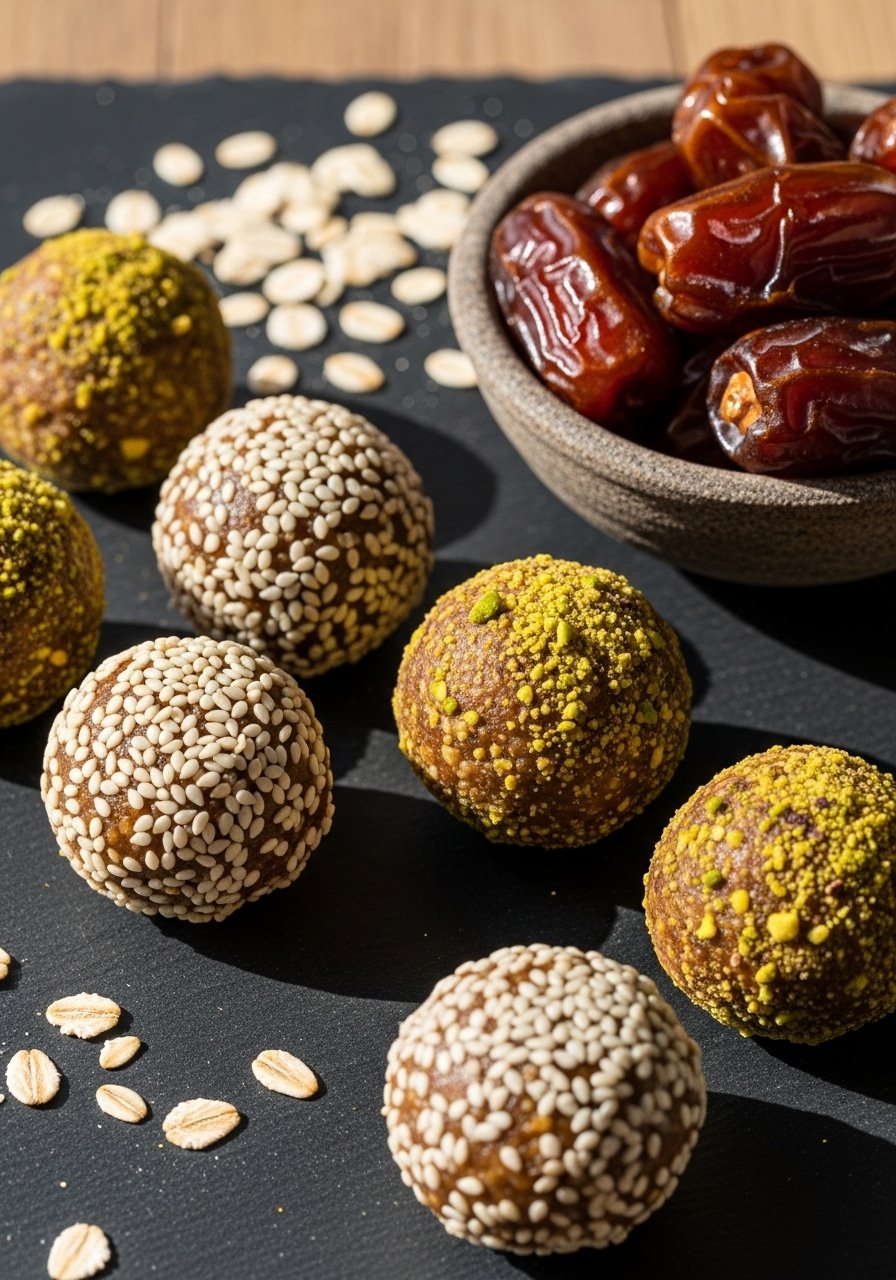
No-bake energy balls combine nuts, dates, and seeds into bite-sized powerhouses. They're quick to make, shelf-stable, and perfect when you need a clean energy boost. They have a soft chew, nutty flavor, and hints of citrus or cocoa depending on the mix-ins. Great for hikers, students, or anyone craving a compact healthy snack.
Ingredients
- 1 1/2 cups pitted Medjool dates (about 10–12)
- 1 cup raw rolled oats
- 3/4 cup raw almonds
- 1/4 cup raw pistachios, chopped
- 2 tbsp chia seeds
- 2 tbsp ground flaxseed
- 2 tbsp unsweetened cocoa powder (optional for chocolate version)
- 2 tbsp almond butter or peanut butter
- 1 tbsp coconut oil, melted (optional)
- 1 tsp vanilla extract
- Zest of 1 orange (or 1 tbsp maple syrup for sweeter)
- Pinch of sea salt
- Sesame seeds or extra chopped pistachios for rolling
Instructions
- Pulse raw almonds in a food processor until coarsely chopped, about 6–8 pulses.
- Add pitted dates, rolled oats, chia seeds, flaxseed, cocoa powder (if using), almond butter, coconut oil, vanilla, orange zest, and a pinch of salt.
- Process until mixture comes together into a sticky mass—about 8–12 pulses. Scrape down sides as needed.
- Test by pinching a small amount; it should hold shape when pressed. If too dry, add 1/2 tbsp water or a bit more nut butter.
- Scoop about 1 tablespoon per ball and roll between palms to form 18–20 balls.
- Roll finished balls in sesame seeds or chopped pistachios for texture.
- Chill for 30 minutes to firm up.
A digital kitchen scale helps portion evenly when you want uniform balls.
How to Serve It
Keep energy balls in an airtight container in the fridge for up to 2 weeks, or freeze for up to 3 months—they thaw quickly. Pack one or two with a small piece of fruit for a balanced mini-meal. These balls are a vegan, gluten-free-friendly healthy snack when you use certified oats.
You now have six reliable, tasty options for healthy snacks that satisfy hunger and flavor. Try a few this week and pin the recipes you love for later reference. Which one do you want to make first—something sweet and creamy, or something crunchy and savory? Share your favorite with a friend or save this page for your next snack-prep session. For general prep and baking across these recipes, I reach for a silicone baking mat and a food processor—they make cleanup easier and cut hands-on time.